Do you have a domain hosted with GoDaddy? Want to secure your website with an SSL certificate? This guide was created especially for you!
The security of your website is one of the most important things to keep in mind. An SSL certificate is vital for protecting your website from possible threats. It encrypts each session, including logins, payments and other sensitive data sent back and forth.
Obtaining an SSL for GoDaddy domains consists of several steps. To begin with, check if third-party SSL certificates are allowed (step 1) on your GoDaddy hosting plan:
| GoDaddy Product | Third-Party SSL Support |
|---|---|
|
Supported 🙂 |
|
Not Supported 🙁 |
SSL certificates are never ready-to-use right from the box, because they have not yet been connected to any domains. That’s why the next step will be to generate a Certificate Signing Request (CSR) (step 2) that will be used for activating your SSL. The CSR includes some basic info for your future certificate. This includes the domain name for which it should be activated, and any company details. The process doesn’t require any coding or techie know-how, and may take only a few minutes of your time.
Next, copy the CSR code and activate the certificate via your SSLs.com account (step 3).
As soon as your certificate is activated, Sectigo CA will check your domain managing rights. Here’s a detailed guide on how to complete the Domain Validation (step 4). Usually, this step takes about 15 minutes.
Note: For an Organization Validation (OV) or Extended Validation (EV) certificate, the business validation should also be completed as well, after the DCV. Sectigo CA will look up whether the organization from the CSR (used for certificate activation) is legally registered and is operating successfully. You can find the required company documents for OV and EV orders on the linked checklist pages as well.
Finally, we came to the part when your certificate is issued and active, and the certificate files are emailed to the mailbox entered during activation. From this point, there is only one step left: the active certificate should be installed in your GoDaddy cPanel (step 5). This takes about 5 minutes of your time.
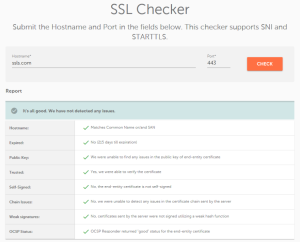
After the installation is finished, it’s time to check if it was done successfully. You can easily check the SSL installation via this online tool. Simply paste the domain name under “Hostname” and hit “Check”. If everything went correctly, you should see a message like on the below screenshot.
Note: You may need to clear the cache of your web browser before checking the live website yourself.
Keep in mind that the SSL installation does not make https:// default on the server. It’s possible to think the website has not been secured, even with the “It‘s all good” message from the SSL checker. That’s why you may also wish to set up the redirection from insecure http:// to encrypted https:// (step 6). To enable the redirect, just follow the steps below:
- Log into your GoDaddy account and open your product cPanel
- Go to File Manager and choose “Settings” from the upper right corner of the page. There you will need to make sure that the hidden files displaying option is enabled.
- Open the ‘public_html’ folder and edit the ‘.htaccess’ file. In case there is no such file available, click the “+ File” button in the top of the page and create a new one.
- In the ‘.htaccess’ file. You will need to paste the following rewrite rule into the bottom of the document:
RewriteEngine On
RewriteCond %{HTTPS} off
RewriteRule .* https://%{HTTP_HOST}%{REQUEST_URI} [L,R=301]
5. Save the file and check the redirect in your browser.
Now, after completing all the steps from above, you’re good to go. You are welcome to contact our Support Team any time if you are facing difficulties with SSL configuration. Our agents are here 24/7 to help you!

Cora is a digital copywriter for SSLs.com. Having eight years of experience in online content creation, she is a versatile writer with an interest in a wide variety of topics, ranging from technology to marketing.
